【GAS】天気予報を表示するアプリを作る~console.logで表示~【第2回】
前回はjsonの中身を見てみました。今回は、それを使って降水確率と気温を、ログに表示させてみたいと思います。
jsonを表示できるようにする
今回は、降水確率を3つ取得し、気温を2つ取得してconsole.logで表示させるアプリを作ります。
まずは、jsonを取得するURLを定数に入れておきます。エリアコードは自分の地域などに合わせて変更してください。
const weatherUrl = 'https://www.jma.go.jp/bosai/forecast/data/forecast/130000.json';UrlFetchAppで取得します。
var weatherj = UrlFetchApp.fetch(weatherUrl);JSON.parseで読めるようにします。
var weather = JSON.parse(weatherj);繰り返し(for)を使って、console.logに降水確率を表示します。3回表示します。
  for(let i=0;i<=2;i++){
    console.log(weather[0]["timeSeries"][1]["timeDefines"][i] + ":" + weather[0]["timeSeries"][1]["areas"][0]["area"]["name"] + ":降水確率" + weather[0]["timeSeries"][1]["areas"][0]["pops"][i]);
  }
気温も同じように表示させます。
  for(let i=0;i<=1;i++){
    console.log(weather[0]["timeSeries"][2]["timeDefines"][i] + ":気温" + weather[0]["timeSeries"][2]["areas"][0]["temps"][i]);
  }
GAS全文
function getMessage(){
  const weatherUrl = 'https://www.jma.go.jp/bosai/forecast/data/forecast/130000.json';
  var weatherj = UrlFetchApp.fetch(weatherUrl);
  console.log(weatherj);
  var weather = JSON.parse(weatherj);
  console.log(weather);
  for(let i=0;i<=2;i++){
    console.log(weather[0]["timeSeries"][1]["timeDefines"][i] + ":" + weather[0]["timeSeries"][1]["areas"][0]["area"]["name"] + ":降水確率" + weather[0]["timeSeries"][1]["areas"][0]["pops"][i]);
  }
  for(let i=0;i<=1;i++){
    console.log(weather[0]["timeSeries"][2]["timeDefines"][i] + ":気温" + weather[0]["timeSeries"][2]["areas"][0]["temps"][i]);
  }

  return weather;
}
これを実行すると、以下のようになります。
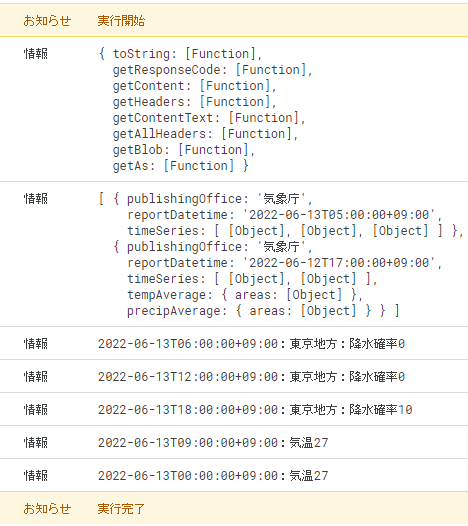
JSON.parseする前は、読めていないことがわかりますね。
また、JSON.parseした後も、配列などを指定しないと[object]となって、内容が表示されていません。
最後に
今回は、ログにだけ表示されてみました。jsonの中身の取り出し方なども気をつけないと間違えた値を取り出してしまうので、配列などに注意しましょう。
次回は、HTMLでも表示させてみたいと思います。


【GAS】天気予報を表示するアプリを作る~目次~
- 【GAS】天気予報を表示するアプリを作る~jsonの中身のチェック~【第1回】
- 【GAS】天気予報を表示するアプリを作る~console.logで表示~【第2回】
- 【GAS】天気予報を表示するアプリを作る~HTMLに一部表示~【第3回】
- 【GAS】天気予報を表示するアプリを作る~地域を選択できるようにする~【第4回】
- 【GAS】天気予報を表示するアプリを作る~テーブルで天気予報を表示~【第5回】
- 【GAS】天気予報を表示するアプリを作る~HTMLにCSSを追記~【第6回】
- 【GAS】天気予報を表示するアプリを作る~日付の整理~【第7回】
- 【GAS】天気予報を表示するアプリを作る~ドライブから読み込む~【第8回】
- 【GAS】天気予報を表示するアプリを作る~画像を表示させる~【第9回】
- 【GAS】天気予報を表示するアプリを作る【最終回】